Saturday, 26 February 2011

Give Your Nails A Spring Awakening!

Hey beauties! 

Want to feel pampered and polished? 
Need to get set for the new season of spring? 
OPI nail varnish is the way to go! 
OPI is used in many professional salons, and I've always wanted to know what all the fuss was about...

My boyfriend took me to this gorge little boutique in Bath called Mee (you beauties should check it out http://www.meeboutique.com/), and treated me to not 1, but 2 beautiful new OPI colours :)


I know grey is set to be a big trend for nails this spring, but I felt I missed the pretty pastel shades of summer. So, my first choice was a colour named "Malaysian Mist" which is part of the OPI "Classic Colours Collection 2011".


One coat of this shade dried quite see through, almost like a manicure base colour. 


After a second coat, I instantly fell in love. Its much more of a peachy shade than I thought it would be (I don't think you can really see that in the pictures), but it's fab! Such a great subtle daytime colour. I think I actually prefer it to pinker shades I usually wear, it's quite shiny and really cute for fresh spring days.  


My second choice is called "Houston we have a purple" and it's from the Texas Collection 2011. 


OPI describe this shade as galactic violet, which is exactly what it is! However, after the first coat I applied, you could see the streaks from the brush:


After a second coat, it looked much better. "Houston we have a purple" was much pinker than I thought it would be, but I still think its a great shade for spring night time glam, I'm hopelessly in love with this gorge varnish. 


OPI have springs prettiest polishes, I love the names of the shades and collections, and the shape of the bottle.
They're £10 for a 15ml pot, which it says you can use for up to 24 months. 
The bristles fan out for maximum coverage, making life very easy. 
I was impressed by how strong and durable they are too. 

Overall, brilliant varnishes that definitely get my vote.

Finally, a last minute tip for you beauties. If you find that your nails are dry and flakey, try adding some sulphur to your diet (foods like asparagus and garlic). This should help strengthen your nail bed. 

Cheerio for now beauties Xx

The colours have varied to what I thought they would be like, so I would definitely recommend for you beauties to take your time to find one you really love before purchasing.

Tuesday, 22 February 2011

Beauty Rehab

Hey beauties, 
if your anything like me, addicted to your make-up each and everyday, constantly straightening and curling your hair, you need to TAKE A BEAUTY BREAK!

Make an effort to have at least one day of the week make-up and heat damage free. Give your skin time to breathe, don't even apply face-packs, just leave your skin well alone! It sounds so obvious but it really does work and you will start to see the benefits a little air can do. 

Are any of you beauties guilty of bleaching, hair-drying, GHD abuse? Try a little hair rehab and give it all up for a few days. There are loads of styles you can try that don't involve heat, a low maintenance messy side bun, Natalie Portman style:


Or a slicked back ponytail, Kim Kardashian style:


When I'm feeling in need or a hair remedy, I usually smooth over the tips of my wet hair with a drop or two of baby oil, and rinse thoroughly. It helps to repair damaged ends and adds moisture. Your hair should be glossy and smooth in no time beauties! Xx

Wonder Woman Launch! Yay!

Good evening beauties,
                                 remember I told you Mac had joined forces with Wonder Women to create a new iconic range? Well, its finally here! Take a look at the spectacular comic book inspired counter in Selfridges, London:


UH-MAZ-ING!!! There is everything from eye-liners and shimmers to lip glosses and brushes. So for eyes that POP and Lips that pack a PUNCH, make sure you beauties head to your nearest Mac counter! I know I will be Xx

Sunday, 20 February 2011

Oooh La La Lashes!

Hello, hope all my beauties have had a first-class weekend! 
Now, what better way to kick start your brand new week then with a BBF (Best Beauty Find)?
Every once in a while a product comes along that instantly becomes one of my make up bag must haves, Chanel "Inimitable Intense" mascara in "Noir 10" became one of them as soon as I lay my hands on it. 

It's my personal favourite out of all the Chanel mascaras, so glossy and natural looking. The best news beauties, is that it doesn't clump!
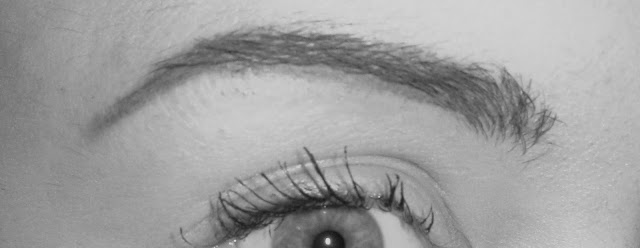
One or two coats will be enough, wait for the 1st coat to dry properly before you apply the second. 
Inimitable Intense will really lengthen your lashes and gives a really nice curl without the aid of eyelash curlers, smashing for speeding up the old morning make-up routine! 
To show you just how fabulous it really is, I've taken before and after shots...


The small rubber wand makes it easy to get to each and every lash, even those pesky smaller ones in the corners of your eyes. So it's perfect for those of you who like definition on your bottom lashes (I'm a big fan). It separates the lashes pretty well too and leaves a dramatic, sophisticated look. 
It's particularly good for you beauties who don't wear much make up or have short eyelashes, it'll really make your eyes stand out.

Inimitable Intense costs £22 but a little really does go a long way. For Chanel, a designer brand, it's an investment considering some high-street brands can be nearly just as much but half as effective. You beauties have gotta love the packaging too, right?! Classic!

Trust me, once you've tried it, you wont look back. Xx

Friday, 18 February 2011

Perfect Hollywood Brows!

Hey beauties!

So, groomed eyebrows are one of my big beauty musts for a perfectly polished look. 
A little grooming goes a long way, it adds shape to your brow, opens up your eye and structures your whole face. 
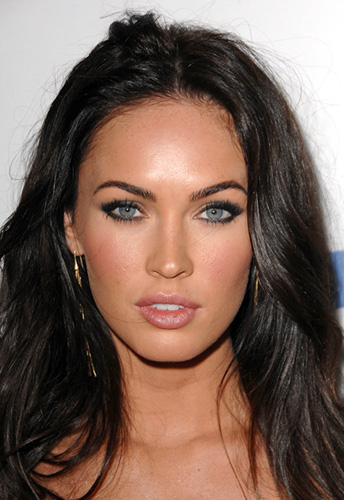
So if you beauties desire perfectly shaped brows Hollywood style just like Megan Fox, here's your how to...


1) PLUCK! 
    You will need a little shape to begin with, let your brow hairs grow until you have enough to work with. Here is a picture of the sort of shape you should aim for:


    I find it's always easier to get the right shape if you brush your brows first with a spoolie (the brush on the end of your eyebrow pencil). 
Remember not to get too carried away and over-pluck, it's not a good look at all. 
Never pluck above the brow, only from below.  

2) TRIM!
    If any of you beauties have long thick eyebrows like me, you may also want to trim them. You can do this by brushing them upwards with a spoolie and use a pair of clean nail scissors to gently snip the ends off. 
    TIP: you wont need to cut very much off, literally just the ends to neaten up. 


3) EYEBROW PENCIL!
    By this stage, you beauties will be ready four your eyebrow pencil application. Don't be scared, it's super easy once you get the hang of it!
    I always start by using the spoolie to comb through brows.
     
Next, draw 3 dots, 1 just above hair-growth at the beginning of your brow, 1 3 quarters of the way across your brow, and 1 just after your brow finishes.


I usually define my own brows a little differently to this, taking the centre dot a little further over so the arch isn't as big and my brow appears longer and straighter. But this is just my own personal preference. You beauties will have to experiment to see what you like the most.

Now, it's simple a case of joining the dots together and filling in sparse areas with short, feathery strokes. Remember to sketch in the same direction as your natural hair growth and not to press too hard on your pencil, you don't want your brows to look too harsh and heavy. This should really define your brows and create a gorgeous arch. 

Lastly Brush into place with your spoolie. The transformation is complete, you should finish with a precise arched brow!


So there you have it beauties, flawless Hollywood brows in minutes, just like the stars! Xx


Wednesday, 16 February 2011

Colour me Copper

Greetings beauties, good news... bronze is back!
A chic batch of browns are dominating beauty counters, perfect for creating smoky eyes and great for a more subtle daytime look too. 

My BBF (best beauty find) is No. 7 by Boots, in "Mushroom". It's only £7 and is such a lovely daytime shimmery shade. 
Another good one is Nars coconut Grove ( £16) which has more of a matte finish. 
I LOVE copper eyes, I wear them everyday and can't get enough! 
Try it out beauties, see what you think Xx

Brush Up Your Brushes!

Hey beauties!
Isn't it so annoying when your applying your make up, and the hairs from your brushes stray out onto your face? Eugh! 
Well, I'll let you in on a little secret...
When you buy new make up brushes (it doesn't matter if its a foundation, eye or blusher brush), wash them with shampoo and conditioner before you use them. This will stop those pesky little hairs from coming loose. It works like a charm! Xx


The Big Benefit Experience.... Part 2


Good Evening beauties, you'll be pleased to know it's time for the next snippet of Benefit! 

10, a gorgeous bronzing/highlighting combination, I absolutely love it. It comes in a cute little box (a good size for our make up bags) and is half bronzer, half pinky shimmery highlighter. 
10 comes with a square brush, perfect for loading half and half in one effortless sweep. 


You beauties will have to be a little careful when loading your brush, the powder is a little loose, you wont want to apply too much and have that streaky look! A little tip of mine for perfect application, is to tap the brush after loading, so the excess power falls off. Then, blow on the brush and sweep a little onto the back of your hand. This way, it wont look too harsh when you apply it.
Gently sweep the brush from the apples of your cheeks, making sure the highlighter half of the brush is on the tops of you cheeks, and the bronzer is on the bottom, hollow of your cheeks.
Remember beauties, don't take the brush all the way back to your hairline, it will look more natural if you just touch on the cheekbones and hollows.

I just love the mixture of pink and bronze with 10, it really brightens up you face to use the combination rather than just a bronzer alone. 
I'm also really loving the tone of the bronze half, its such a nice natural subtle colour.

Now,  I've got to be totally honest with my beauties, so the only thing I would rate as a negative for this product would be the brush. The hairs of the brush are quite stiff and rather scratchy, they also tend to fall out. So I would recommend you use your own (No.7 do a really nice directional blusher brush).  It is £23.50 but it'll last for months, you wont need to use much.
So it's a pretty good review for my pretties :) Xx

Monday, 14 February 2011

Mondays Make-up Bag Make-over!

Happy Valentines day beauties! I hope you've all had a lovely day. If you're still feeling the need to treat yourself, just take a peek at what I've stumbled across...


These beautiful make-up bags are all pretty glamorous, don't you think? I'm just loving the cute bows, chic satin quilting and fun stripes. They're perfect for your nice cosmetics and will look lovely on your dressing table too.

These are my personal favourite...


If, like me, you like to cart your essentials around with you wherever you go, they come in larger sizes too. Just click the link below to buy:

Beautiful Bags for my beauties. :) Xx

Sunday, 13 February 2011

The Big Benefit Experience.... Part 1


Listen up beauties! I love Benefit make up, you can find some really nice bits, the packaging is fun, and the names of products make you giggle too.
It's actually a really positive cosmetics brand, the motto being 
"Laughter is the best cosmetic, so grin and wear it".
There are some products that I would really recommend, and others that I haven't found so wonderful. My Beautiful Benefit Experience will let you in on all the BBF's of Benefit...

Plump it up (lip plumper)

Want fuller, richer, juicier looking lips- Angelina style? Well, you've found the right product beauties, it actually works and is a great base for lip colour too. "Plump it up" will make you look lip smackingly gorgeous!
Using clean fingertips, just dab a small blob on the centre of your bottom and top lips.

 Soon you'll feel a tingling sensation, this means it's working. You should notice the difference within a couple of minutes and wait another couple of minutes before applying a gloss or lipstick. Just a little warning though, don't get too carried away, you only need a tiny bit otherwise you could end up with tingly puffy lips all day... not what we want!

I wouldn't say "Plump it up" was a make up bag necessity for you beauties, but definitely good for a night out, special date, or just when you want a glamorous boost! Xx 

Pucker up and Pout, it's the Best Lipstick About!

Hey Beauties!
So, today I thought I would share my BBF (best beauty find) lipstick EVER! 
I could Not live without Estee Lauder Pure Colour in "Crystal Pink", in fact, it never leaves my make up bag!

Pure Colour glides on so smoothly and has a lovely soft moisturising texture, it wont dry out your lips like some lipsticks can. It has a shiny glossy finish to it, the perfect antidote to your dreary winter days. :)

It smells and tastes beautiful, lasts for a long time and only really needs reapplying after you eat or drink. It even has a little mirror on the tip of the lid, brilliant for all you beauties in a rush!


Pure Colour comes in a really amazing range of colours, right through from purple to orange. If you want to try something a little different, "Melon" is a lovely shade of peachy orange. "Crystal Pink" in particular, although it sounds tacky, is a lovely pinky peachy natural shade. If you want more of a pop pout, you can always apply an extra layer (after blotting the 1st layer on a tissue). 

If your looking for the perfect lipstick to be faithful too, this is it. The only downside is the £18 price tag, but beauties I promise you it'll be worth every penny! Mwa Xx

Friday, 11 February 2011

A Classic Kim Kardashian Look

Hey beauties! 
I've had a guilty obsession with Kim Kardashian for a while now, I can't help but admire her 24/7 flawless make-up. It's almost sickening how beautiful she looks, perfectly arched eyebrows, dark thick eyelashes, plump full lips, and absolutely flawless foundation. Stunning.


According to the Kardashian sisters they all "just want to be groomed" and hair and make up (or as they call it h&m) is a very important aspect of their lives. Kim believes that beauty begins with good grooming, and so should you beauties!

So many bloggers have tried to recreate Kims classic smokey eye, nude lip look, so I thought, who better to show my beauties just how to do it then Ms Kardashian herself?! 
In the video links below Kim and her make up artist Mario give you a step by step tutorial for the perfect look, it is quite advanced in some places, but you can pick out some easier tips too. These are good videos to learn your basic make-up application tricks, enjoy beauties! Xx 


 Part 2) Eyeliner application, Eyelashes, Concealer (under eyes). http://www.youtube.com/watch?v=Zg8ZEXqsgJE&feature=related

 Part 3) Bronzer application, Blush, Lips.


My thoughts....
The beauty blender is basically just a sponge, you can buy make up sponges in Boots, they're really cheap. I find it is best to use a sponge to apply foundation as it give more coverage and a completely flawless look like Kim's. 

I love that Mario uses eyeshadow to fill in brows, who knew! All this time I've been using a pencil, time to experiment....

What a good idea to count when you curl your eyelashes, genius!

Also loving that Kim uses affordable products like Maxfactor, Loreal and Mac alongside more luxury products like Armarni. If it's good enough for Kim, it's good enough for us beauties, give it a go! Xx


 Part 1) Foundation application, Perfect eyebrows, Daytime grey eyes.http://www.youtube.com/watch?v=pZQbvm00vq8&feature=related

Tuesday, 8 February 2011

Tempted by Temptress?

For those of you beauties who prefer a darker, more striking nail, here's my absolute favourite! 
It's by Boots No.7 Stay Perfect and its called Temptress (£7). 
I LOVE dark nails, but sometimes don't want to feel too harsh or gothic, so Temptress is the perfect alternative. It's more of a dark raspberry colour, so still very feminine. 1 coat alone gives you more of a reddy plummy colour, and two coats gives the darker effect.


I usually put a clear top coat on but you don't really need to with this varnish. The colour is so classic and goes with any outfit, day and night!
I have a few no.7 nail varnishes now and I really recommend them. They have such a good range of colours, keep up to date with the latest fashions, hardly chip and dry super fast!

So go ahead beauties, give temptress a try, I hope you love it like I do! Xx

And you thought brown was boring... Barry M vs Chanel

I know the pearly shimmery nail is all the rage at the moment, but I just can't help going back to my old faithful nail colours time and time again. So, I thought I'd share these little BBFs (best beauty find) with you beauties!
As any make up and beauty fan knows, when you are excited about a product, you just have to let everyone know! 
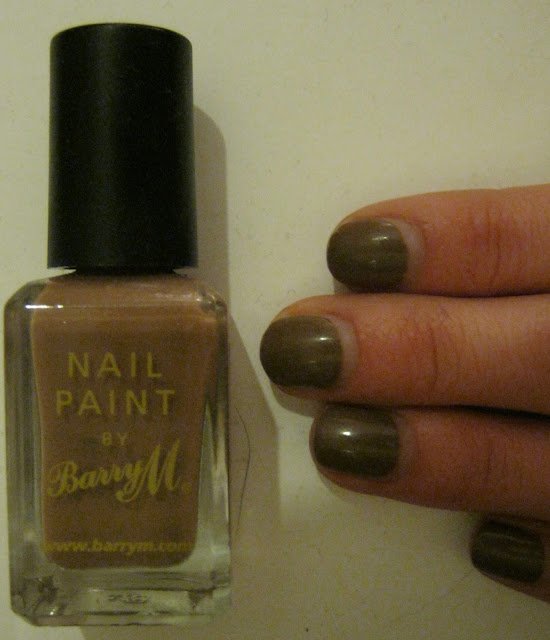
Well, this Barry M nail varnish in "mushroom" is most certainly a BBF of mine, for only £2.95 it's really impressive. It's EXACTLY the same shade as Chanel varnish for £17, (so exact in fact, that the Chanel beauty consultant even thought I was wearing it) but for a fraction of the price. 

After 2 coats of "mushroom" (and no base or top coat) I was able to wear it chip free for about 4/5 days. The shade literally goes with everything and is sooo chic!

I love it, definitely one for the beauty bucket my beauties! Xx

Saturday, 5 February 2011

Calling all lipstick Virgins!!

Chanel Rouge Allure Laque, is for my beauties who can't decide between a lipstick or gloss, it's a perfect combination of the two!


It glides on with an applicator like a gloss (or you can just gentle dab it on with your fingers for a more subtle look) but, like a lipstick, you can get a lot more depth from the colour. Just slick on an extra couple of layers if you want a fuller, plumper look.


It is a little on the expensive side, but Chanel is a must for any make up lovers make up bag.
Perfect for a little treat to brighten yourself up and comes in loads of shades, it lasts for ages too! :) 
In summary, my favourite luxurious, elegant, creamy, shiny, wonderful lip lacquer, treat yourself beauties!

Xx